Its Fabulous Friday!
This is the final Fabulous Friday of 2011! Feel free to link up anything that you have created, but just for fun lets also link up your favorite posts of the year! I don't care if you have already linked it once before, lets have the biggest party of the year!
Please don't forget the button!
Pages
▼
Friday, December 30, 2011
Thursday, December 29, 2011
DIY Thursday: Blinged out Chadelier Wall Art
Its DIY Thursday! I must admit, I LOVE the project that I shared today!
Head on over to EAD Designs to see the chandelier wall art that I made for my little sister's bedroom makeover! We decided to do that for her for Christmas, and I think that this super cute chandy will really spruce up her room!
Wednesday, December 28, 2011
Winter Forest
So, I was a bit late on the Christmas craft train this year. But I did decide to make a little last minute decor that I can leave up through the winter! It is a super easy project that will take maybe 15 minutes, if you wanted to give it a try.
First, I took some scrap poster board:
And I cut it and rolled it into a little cone.
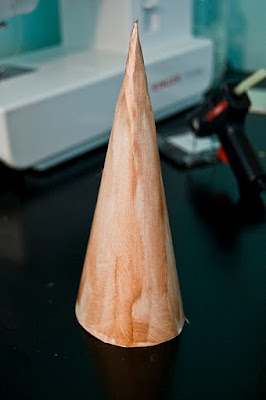
After hot gluing the edges, this is what I had. A little white Christmas tree!
So I took some bronze and silver ink stamp pads that I had laying around.
And I rubbed them all over my little tree. I ended up going primarily with the bronze on this one because it showed up better and I just really liked the way that it looked.
I did the same process to make another little tree.
For this one, I hot glued rhinestones all over it. I actually had the intention of covering the entire tree, but I ran out of rhinestones so I had to improvise a bit. Maybe someday, I will buy a large bag of them and make a fully bedazzled little tree. But we were going with free and quick for this project!
I made another cone, this one larger than the other two, to give some dimension.
For this one, I had a strip of glitter tape left over from our Christmas cards.
I simply wrapped it around the bottom and middle to give me tree number three!
For my fourth and final tree, I wanted to do something else with the bronze, but didn't want to cover it like before. So I pulled out a swirl stamp that i used on our wedding invitations and stamped bronze swirls all over the tree.
Here is it with just one stamp. If you do this, be sure to allow drying time before touching or it will smudge. I learned that the hard way!
And here are my cute little mixed metal trees!
Once al of the Christmas decorations are down and we transition to the winter mantle, they will be on there in some form such as this:
For now, they are on the end table with the quatrefoil vase! They turned out so cute! I lurve them! :)
You could totally buy pretty scrapbook papers and do this without having to decorate them and I just may do that when I get around to it! For now, they are perfectly precious the way that they are!
Tomorrow's DIY Thursday is an awesome one! Be sure to check back! Also, we are in the process of selecting which shade of warm brownish-tan we are going to paint the living room and let me tell you, this makes me SO excited! It is the central room of our home and probably the only one that had not had some decor TLC! (At least it is the only room that's walls are still just off-white). So, while I have a billion things to do tonight, I will probably spend the evening prepping it for paint so that I can get this show on the road! Can't wait to share!
Tuesday, December 27, 2011
Merry Christmas! (Slightly delayed)
Hey friends! I know I am a couple of days behind on my Christmas post, but I did not want to waste precious, fleeting Christmas time editing an uploading photos. So bare with me as I share our Christmas on here! (Warning: tons of photos).
First stop, the upstairs tree. This is a smaller artificial tree in the living room that you can see through the picture window from outside. My sweet older sister just gave us all of the blue and silver decorations this year! She did not need them anymore...free tree! (well the decorations...we already owned the tree)
Here are night-shots of it. She even gave us this lovely silver tree skirt (which the cat has decided she loves to play with).
The topper is so cute!
I just LOVE the glow that it gives off! (Living room walls will be changing soon! but that is another post)
We hung ornaments from the curtain rod of our picture window and strung white lights around the outside of it.
These are also following the blue and silver theme. Please ignore the messy pillows and blanket strewn across the couch. They are not always placed just-so! ;)
On the coffee table we have this lovely bowl that Michael's mom gave us over thanksgiving. We filled it with ornaments and curly ribbon. It helps break up all of the blue and silver.
Also over Thanksgiving break, Michael's mom got us this fun glittery candle from Kirkland's. I MISS having one of those around here! It is so cute and festive. I wrapped some berries (a Black Friday find at Michaels) into a loop around the bottom and placed my cute little sparkly bird (also a Black Friday Find) next to them. He is blurry because I took these pictures at night to capture the full effect. Don't worry, he will be around for the winter mantle, so you will see more of him! :)
On the back of the toilet upstairs, I filled our little cloche with extra ornaments. Simple but cute!
We have Christmas hand towels that I love to put out every year! The snowflake ones will also stay for the rest of winter.
Aren't they so cute?!
On the bathroom counter, we have my cute little Precious Moments nativity set (a gift from Michael's mom last Christmas). Someday, when we have a little one, I will put this in their room to teach them the real meaning of Christmas. For now, it is cute in the bathroom!
Michael and I made Christmas cookies...we still have plenty!
Michael strung lighted garland up the banister from the den. It looks so amazing! I really wish we could leave Christmas lights up all year.
And he has his little "village" set up on the table downstairs. (I say "village" because this is a new tradition and consists of two buildings and a train track. I need to start marking the years on the bottom of them, one for each Christmas we are married.
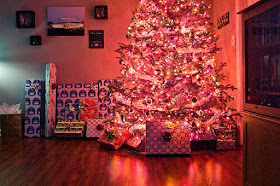
And this...is our tree. *sigh* It is the fluffiest, most amazing tree I have ever purchased. And it smells AMAZING! (It's real...) Michael put at least 4-5 sets of lights (at 100 lights per set) on this bad boy.
This is down in our den-family room. We hang all of our fun, colorful and sentimental ornaments on here (except the ones from the Kitchen tree). I was such a huge tree that the topper had to go in front of the top instead of on it!
Michael has a cute little Charlie Brown ornament that blinks and talks.
And we got this little "New Home" ornament last year from a dear family friend.
I just LOVE the way that it reflects off of the floor!
And here is our Christmas Eve family photo. Me, my sweet hubby, and our daughter.
Isn't she precious? I could just squeeeeeeeze her!
Here is Michael's stocking after Santa came on Christmas morning.
Here is little Indy's! Sorry for the poor photo quality, the lighting was weird and we were anxious to get to the presents!
And my new stocking! Its really actually navy blue to match the other two, but it looks purple in this photo. My hubby is so sweet :)
There you have it. I know, it was a few days late. But I wanted to share our fun decor with you all. I hope that your Christmas was filled with love and family. And remembering how much our heavenly father cares for us.
Gift-wise, this Christmas has spawned a hundred DIY projects that I just can't wait to do/ share! Also, as of January 3rd, my employer is moving me to a work-from-home position. This means that my office/craft room is getting upgraded and organized! I have already started it and can't WAIT to share!
I got an electric sander so that I can finally sand and paint our rescue coffee table in the den. And my hubby gave me paint for the living room! So we will be painting that and possibly adding moulding! (eek! I lurrrrrve moulding!) So many house changes that I can't wait to get started on!
First stop, the upstairs tree. This is a smaller artificial tree in the living room that you can see through the picture window from outside. My sweet older sister just gave us all of the blue and silver decorations this year! She did not need them anymore...free tree! (well the decorations...we already owned the tree)
Here are night-shots of it. She even gave us this lovely silver tree skirt (which the cat has decided she loves to play with).
The topper is so cute!
I just LOVE the glow that it gives off! (Living room walls will be changing soon! but that is another post)
We hung ornaments from the curtain rod of our picture window and strung white lights around the outside of it.
These are also following the blue and silver theme. Please ignore the messy pillows and blanket strewn across the couch. They are not always placed just-so! ;)
On the coffee table we have this lovely bowl that Michael's mom gave us over thanksgiving. We filled it with ornaments and curly ribbon. It helps break up all of the blue and silver.
Also over Thanksgiving break, Michael's mom got us this fun glittery candle from Kirkland's. I MISS having one of those around here! It is so cute and festive. I wrapped some berries (a Black Friday find at Michaels) into a loop around the bottom and placed my cute little sparkly bird (also a Black Friday Find) next to them. He is blurry because I took these pictures at night to capture the full effect. Don't worry, he will be around for the winter mantle, so you will see more of him! :)
On the back of the toilet upstairs, I filled our little cloche with extra ornaments. Simple but cute!
We have Christmas hand towels that I love to put out every year! The snowflake ones will also stay for the rest of winter.
Aren't they so cute?!
On the bathroom counter, we have my cute little Precious Moments nativity set (a gift from Michael's mom last Christmas). Someday, when we have a little one, I will put this in their room to teach them the real meaning of Christmas. For now, it is cute in the bathroom!
Michael and I made Christmas cookies...we still have plenty!
Michael strung lighted garland up the banister from the den. It looks so amazing! I really wish we could leave Christmas lights up all year.
And he has his little "village" set up on the table downstairs. (I say "village" because this is a new tradition and consists of two buildings and a train track. I need to start marking the years on the bottom of them, one for each Christmas we are married.
And this...is our tree. *sigh* It is the fluffiest, most amazing tree I have ever purchased. And it smells AMAZING! (It's real...) Michael put at least 4-5 sets of lights (at 100 lights per set) on this bad boy.
This is down in our den-family room. We hang all of our fun, colorful and sentimental ornaments on here (except the ones from the Kitchen tree). I was such a huge tree that the topper had to go in front of the top instead of on it!
Michael has a cute little Charlie Brown ornament that blinks and talks.
And we got this little "New Home" ornament last year from a dear family friend.
I just LOVE the way that it reflects off of the floor!
And here is our Christmas Eve family photo. Me, my sweet hubby, and our daughter.
Isn't she precious? I could just squeeeeeeeze her!
Here is Michael's stocking after Santa came on Christmas morning.
Here is little Indy's! Sorry for the poor photo quality, the lighting was weird and we were anxious to get to the presents!
And my new stocking! Its really actually navy blue to match the other two, but it looks purple in this photo. My hubby is so sweet :)
There you have it. I know, it was a few days late. But I wanted to share our fun decor with you all. I hope that your Christmas was filled with love and family. And remembering how much our heavenly father cares for us.
Gift-wise, this Christmas has spawned a hundred DIY projects that I just can't wait to do/ share! Also, as of January 3rd, my employer is moving me to a work-from-home position. This means that my office/craft room is getting upgraded and organized! I have already started it and can't WAIT to share!
I got an electric sander so that I can finally sand and paint our rescue coffee table in the den. And my hubby gave me paint for the living room! So we will be painting that and possibly adding moulding! (eek! I lurrrrrve moulding!) So many house changes that I can't wait to get started on!