Saturday, December 24, 2011

Last Minute Gift: DIY Curly Ornaments

Merry Christmas Eve, friends! I hope that your day is filed with family, love and remembering the true meaning of this holiday. My hubby and I had a double date with some good friends last night and then made Christmas cookies. Today I have to run to the grocery store (ew!) and do a little cooking, a little cleaning and then Dallas game at 4ish! :) And then of course we will have fun little Christmas traditions and read the Word about how Jesus came to save us from our sins. What a miracle!

Anyway, I just wanted to post a fun little craft that only takes about 15 minutes, for any of you that may still need a little last minute gift! First, you will need a glass ball ornament:
 I got this one at Michaels for like...50 cents I think. You will also need some pretty scrapbook paper. The one I chose for my gift was a vintage love letter.
You will need to cut your paper into strips, not too wide! The size does not matter too much, but they need to fit into the opening at the top.
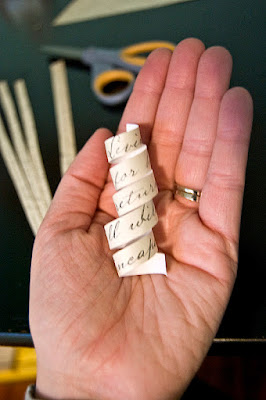
Next, you will curl your strips around a pencil (you could use just about anything, but I found that the pencil worked best) very tightly. Hold them there for a minute.
 Once released, you should get a cute little curly like this:
 Next, take the mental top off of your ornament (carefully, I cut my finger at this part).
 And twist your curly in!
 Repeat at least 5 times. I did varying levels of curl to give it some interest.
 And once you fill it, put the little metal top back on. Here is what you should have:
 I also tied a piece of twine through the loop to hang it with, but I forgot to take a picture before I gifted it! Since I want to start a tradition of making these, I wrote the year on the bottom, very small, with a sharpie. That way they will remember when I made it for them!
I have more Christmas awesomeness to blog, but I do not want to spend my entire Christmas eve on the computer. If I have the free time to get on here, I will! If not, I will share on the 26th :) Just in case, Merry Christmas!

Thursday, December 22, 2011

DIY Thursday: Quatrefoil Ornament

Its DIY Thursday! Today, I shared a really cute Christmas craft. This is such a fun project!
Head on over to EAD Designs to see how I took a simple glass ornament, some vinyl and rhinestones to create a cute little ornament to give as a gift!


Monday, December 19, 2011

Caramel apples pies for Christmas!

So tomorrow we are celebrating Christmas with my sister and brother-in-law before they leave for Wisconsin. I volunteered to provide the dessert.

I did my usual caramel apple pie recipe but with a cute Christmas twist! I took a third pie crust and cut out stars to place over the apples. I was originally going to do trees but i didn't have enough dough!

I know, i know...short and sweet. I just wanted to share! :)


Friday, December 16, 2011

Fabulous Friday #14!

Its Fabulous Friday!

Alright, friends! Christmas is a week and a half away (not even!) and I have a ton of Christmas baking to do this week! And a couple of Christmas parties. I would LOVE some really fun recipes or holiday traditions! Fun creative ideas are obviously also welcome! Show me what you've got!

Please don't forget the button!


Thursday, December 15, 2011

DIY Thursday: Framed Wall Art

Its DIY Thursday! One of my favorite days of the week! Today, I went a little vintage and shared a project that I did a while back. It is one of my favorite projects that I have done to our home to date, and it was too good not to share with all of my new DIY Thursday friends over at EAD!
Head on over to EAD Designs to see how I spruced up our master bedroom with a little vinyl and moulding!


Friday, December 9, 2011

Fabulous Friday #13!

Its Fabulous Friday!

I look so forward to this linky party every week! Even on the weeks where I don't have a chance to comment on your posts, know that I look at and love each and every one!
Please don't forget the button!


Thursday, December 8, 2011

DIY Thursday: Quatrefoil Vase

Its DIY Thursday! I LOVE LOVE LOVE the project that I shared on there today!
Head on over to EAD Designs to see how I took a plain vase and made it amazing with a little vinyl!