Thursday, April 19, 2012

DIY Thursday: Family Tree

Its DIY Thursday!


Today I used vinyl to make a cute family tree for a bare wall in our kitchen! This project took me...maybe 5 minutes! Head on over to EAD Designs to see how I did it!
***ALSO!! Don't forget that today is the last day to enter the dgordon giveaway! I will choose the winner tomorrow afternoon, so get busy!***
****CLICK HERE TO ENTER****

Monday, April 16, 2012

Giveaway #1: dgordon!

Hello lovelies!


I am getting ready to kick off some super exciting giveaways as a way to say thank you to my wonderful readers that I L-O-V-E so much! Today is the first one and I am giddy to share it with you! And jealous that you are going to get it!

I stumbled across this ADORABLE Etsy shop a couple of weeks ago and had to tell you guys about it! The shop is called “dgordon” (direct link: www. dgordon.etsy.com) and is a lovely collaboration between Deb and her father! They create handmade, hand built ceramic pottery, with an earthy look and feel. Lots of texture and all hand glazed too! I am IN LOVE with some of their items! Here are my favorites:


Coral Lotus Ceramic Ring Holder Bowl

Ceramic  Forever Ring Holder Engagement Ring Holder
Wouldn't this be an AWESOME bridal shower or wedding gift?! I am in love.

TWO Ceramic Owls  Seconds Sale

Or how about this BEAUTIFUL sushi set?! I don't even like sushi and I want it!
Ceramic Sushi Set Water Lily with Flower

Coral Damask Bowl

I could go on all day. Their shop is amazing. And I think I want one of everything! So now on to the really fun part! Deb has agreed to give one of my lucky readers this set of 5 itty lace hearts ring bowls. And I am very jealous! But happy for you!

Here are the ways to enter (please leave one comment per entry):
1. You must go to dgordon's Etsy (www. dgordon.etsy.com) and comment with one item you love. (mandatory)
2. You must be a follower of OhhBaby Designs
3. Share this giveaway on facebook.
4. Like dgordon's page on facebook.
5. Like OhhBaby Designs on facebook (link to the right>).
6. Pin this giveaway on Pinterest.
7. Blog about this giveaway.
8. Tweet this giveaway
9. If you can come up with some other really creative way to draw attention to the giveaway, shoot leave a comment and if its kosher I will count it!

And how perfect are these things for gifts?! Speaking of gifts, Mothers day is coming up! There is a whole Mom section in their shop!


In honor of the giveaway, Deb has decided to offer a 10% discount to you my friends. All that you need to do is use the coupon code: SPRINGTIME when ordering.

The Giveaway will end on Friday, April 20th!Good luck!

Saturday, April 14, 2012

Little Shed on the Prairie

Okay its not really on a prairie. Its in the back yard. But for some reason that is what the before pictures made me think of, so that is what you get! Last Saturday (I know...fail that I am just now posting from last Saturday) Michael decided that our rusty shed needed a little love.
It really needs a coat of paint, but that is not what we did. It will happen in the future, just not yet!
He decided that it really needed a bit more landscaping around it.
First, he dug around the front and sides the shape of the bed that he wanted. This is easier with a square shovel, but we don't have one, so he made do with the one in the pic!
Here she is with the bed shape dug out.
Then he let me place the plant variety that he bought how I wanted them.
The next step was to get the edges straight in the back and then lay out the edging.
Edging is important! It helps to define the bed and keep weeds and grass out!

He carefully lined the edging along the side of the bed and drive edging steaks into it. This helps to hold it in place.

Here is the other side of the ramp with the edging down.
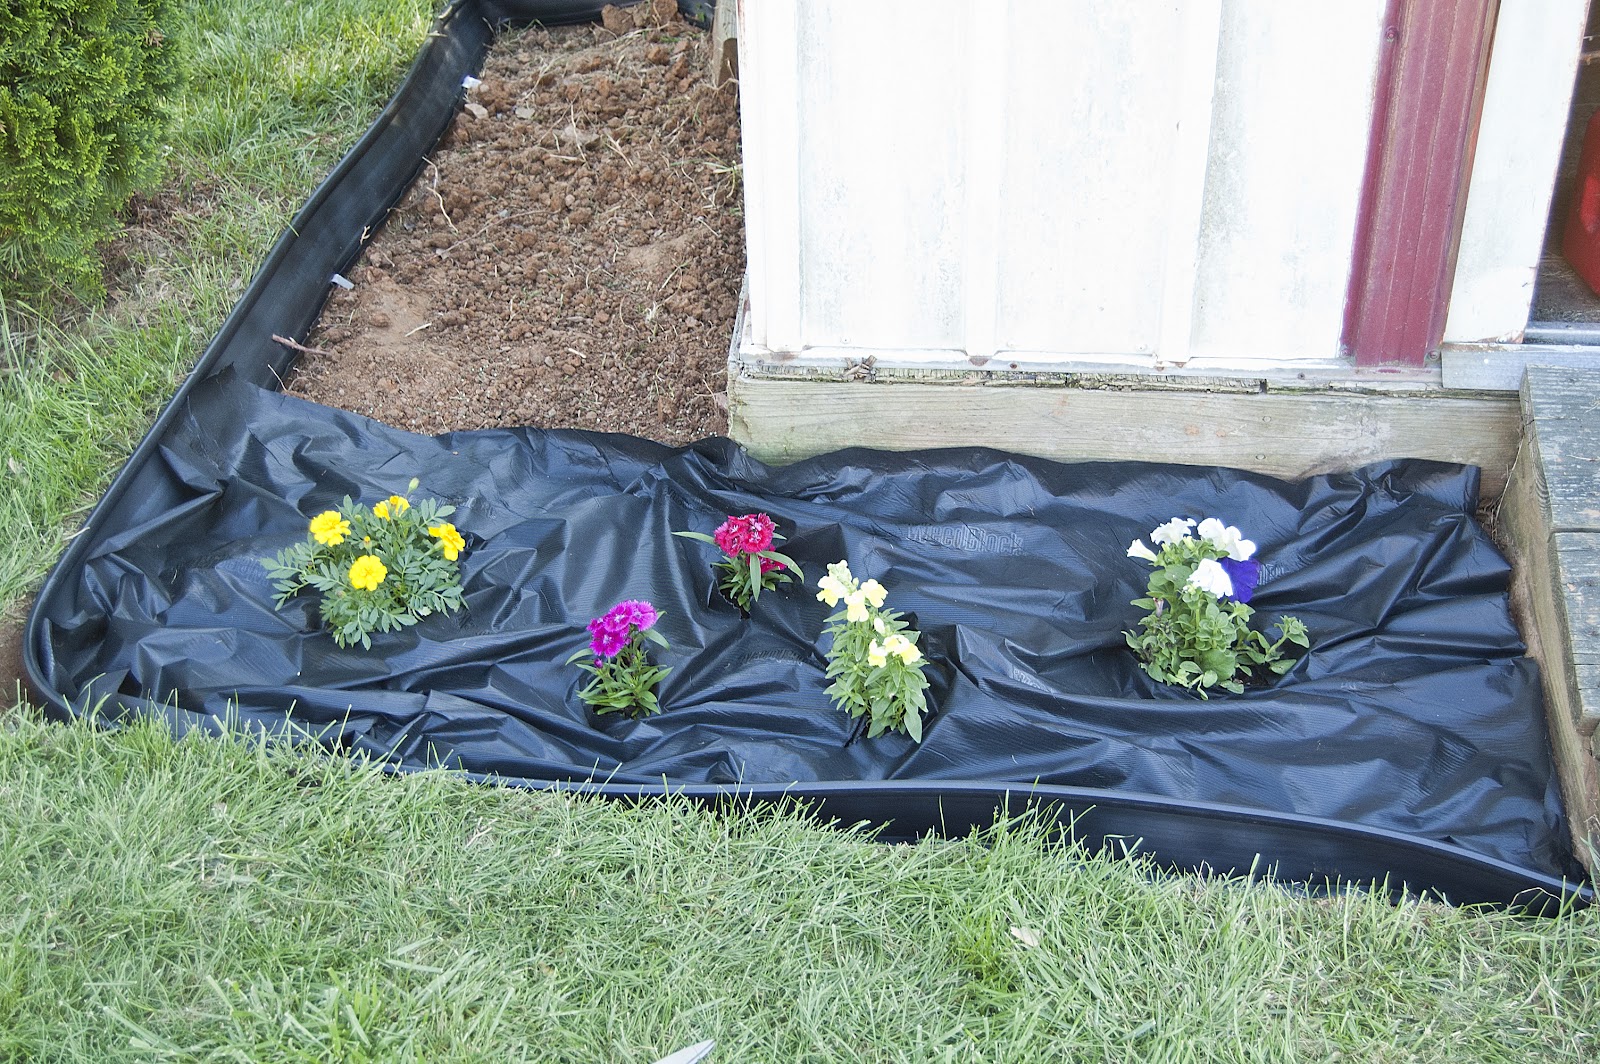
Next he put down underlayment weed guard. This helps keep the weeds from coming up from the bottom.
He cut holes for the plants (with potting soil under them). Once the plants were in he filled around them with black mulch.

Here is the left side of the shed with the underlayment.
And the finished product!


It made the shed look so much nicer! Someday soon (probably not soon) we will paint it so that it looks better itself, but for now its spruced up by its surroundings!

Thursday, April 12, 2012

DIY Thursday: Cute Planner

Its DIY Thursday!

Today I used quatrefoil vinyl to make a simple green planner look custom! I am so in love with the way that it looks and totally proud to whip that baby out in front of people! Head on over to EAD Designs to see how I did it!


Wednesday, April 11, 2012

Colorful Deviled Eggs

Oops! I totally forgot I did have one other Easter project that I did on Saturday to share with you! In addition to the Waffles, I decided to make deviled eggs. But I did not want to make just any deviled eggs, I wanted to make them festive! Here is a little tutorial for ya!

First, get a glass for every color of egg that you want. Fill the glass about half full of water, add a little (I mean little bit) of white vinegar which is optional, and a few drops of food coloring.
 I wanted to do the whole rainbow! For the purple I just mixed blue and red drops.
 Take your shelled hardboiled egg and cut it in half.
 Carefully pop the yolks out and put them in a separate bowl.
 Then, you want to drop one or two egg halves ino each glass and let them sit for 5 minutes.
 Carefully scoop the egg up to see if it has reached the desired color. If not, put it back in for another 3-5 minutes.
 Once the eggs are the color that you want, lay them face down on a paper towel to dry.
 While the whites are drying, smash up your yolks in your bowl. Add mayonaise and mustard to get desired consistency. I just sort of do this to taste. I also add just a pinch of Splenda or sugar and a tiny dash of salt.
 Put your yolks on whatever you intend to serve the eggs on.
 Usually I use an icing bag for this step, but I was out and this is more for the everyday person that does not keep icing bags handy! Just fill a ziplock bag with your egg filling and snip the corner off.
 Squeeze the bag to swirl filling into the hole of each egg. I would recommend starting by filling each egg just enough and then go back and add more, to make sure that you fill all of the eggs.
 The last step is to add a dash of Paprika to each egg!
There you have it! Super cute, colorful deviled eggs good for any Spring get together! I may have to make some if we have a Mother's day party too! And for the summer, you could make red, white and blue! How fun!

Tuesday, April 10, 2012

Easter 2012

Happy belated Easter my friends!

I took the weekend off from blogging, etc. to enjoy celebrating Christ and relaxing with my family. (by relaxing, I mean spring cleaning all day Saturday, but relaxing for Sunday and Monday!) We had a little get together at our house for Easter Brunch on Sunday. I was a horrible blogger and did not take many pictures (like I said, my mind was not on blogging) but I wanted to share the few that I did take with you!

For centerpieces, I made these cute little Easter trees! I got those teal pails from the Target dollar bin. You will see those again this summer! And the eggs and Easter grass there too. Then I just cut dogwood branches from our yard. They are held in place in the buckets with rocks and I put a little water in there too.
 Here they are on the tables. We had to tape the cloths to the tables because Easter decided to be really windy! And since we don't have a large dining area inside we had scrubbed down and set up on the carport. The day turned out to be perfect, despite the wind.
 Everyone brought yummy brunch items, but alas I did not get a photo of those. I did get a picture of our cute little waffle irons pre-action! I made waffle batter from scratch and we had our and my parents waffle iron cranking out fresh waffles! I can't stand frozen waffles, but give me a warm fresh waffle any day!
Sorry, that is really all I've got! I hope that your Easter was blessed, that you celebrated the true reason and had some fun with the others as well. (I love the Easter egg and Easter bunny traditions myself!)

Thursday, April 5, 2012

DIY Thursday: File Cabinet Makeover Pt 2

Its DIY Thursday!
Today's project continues my file cabinet transformation. I am LOVING the way that the cabinet is turning out! It looks so much better in the office, and I am not even finished yet! Head on over to EAD Designs to see how I did it!