Thursday, March 29, 2012

DIY Thursday: File Cabinet Makeover Pt1

Its DIY Thursday!
Today's project shows how I used EAD Designs Vinyl to recover my pee green file cabinet. It is so much easier than paint and so much less messy! This is only Part 1, there is more to do! Head on over to EAD Designs to see how I did it!

Saturday, March 24, 2012

My Newest Addition!

Betcha thought this post was going to be about a pet, child or decor item? Nope! As I mentioned on here oh...forever ago (btw I had a huge relapse since then), and then again right after my hospital scare, I have been on a journey to make healthy lifestyle changes and get in shape. I really committed to this back in mid-January and have lost 15lbs so far, just working out 4 days a week and eating healthy.

Probably 80% of the problem for me when I am trying to get in shape is that I get really bored with doing the same workout day in and day out. Also my body adjusts to them and they stop working. So this time I have been constantly looking for new ways to work out.

Recently my husband got into kettlebell fitness and I can see that he is having great results. I have wanted to start using them too, because I know they are great, but his is way over my weight limit. So today I was in WalMart and came across one just my size for $15! I couldn't walk away. I figure that he can teach me the moves that he does and help me out with it. Only problem was that I wanted to try it tonight and he had to work! So I started scouring the web and found this workout:
http://www.womenshealthmag.com/around-the-body-pass?workout=21113

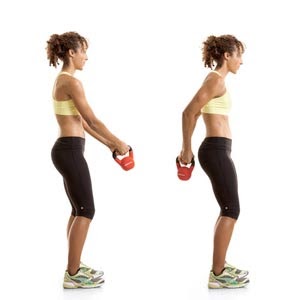
It actually is not super hard. I have been using an 8 lbs kettlebell. Most of the movements are pretty easy, like this one:

However, after doing several reps you start to feel it. I also really love the swings, because I can feel them in my core.


I did the full workout in 2 circuits, waited an hour and half (a bad storm hit and I decided to chill and wait it out...tornado warnings, etc) and then 2 more full circuits when the storm was done. It was a great workout! I know I will be feeling it in the morning! Anyone looking to start a workout or to diversify the one that they are doing, I would HIGHLY recommend getting a kettlebell!

I will let you know how trying to do these with my husband goes!

Spring Mantle

Happy Saturday, friends! The other day I decided that I had had enough of our winter mantle, so I decided to switch all of that chilly decor out for some spring! I was wanting to do it without spending anything, so I went outside and cut some blooms and branches to use in the livingroom.

For the entryway, I placed some branches in my quatrefoil vase and then filled my cloche with jute wrapped eggs that I made last year and some moss balls.
 For the mantle, I rearranged a lot of what was already there and brought my cute Phaltzgraff pitcher in and filled in with branches.
 Its so cheerful and bright! I know they will wilt soon, but I plan to juse keep replacing them with other branches. I am rebelling against the concept of buying fake ones!
 For the other end, I filled a ball jar with water and placed some blooms in that as well.

 Its such a cheerful change to the feel of the living room. We are spending a lot more time wit the windows open so it even feels and smells more Springy.
 I also filled my little decanter with water, snipped some greens and placed them in the water. It turned out so cute!

There you have it! our lovely Spring mantle and cute little entryway vignette. Have you done anything to spring up your house? I plan to try to do some spring cleaning today!

Thursday, March 22, 2012

DIY Thursday: Monogrammed Pail

Its DIY Thursday!
Today's project shows how I used EAD Designs Vinyl to turn a simple white pail into a beautiful spring decoration! I am IN LOVE with the way it turned out!  Head on over to EAD Designs to see how I did it!

Sunday, March 18, 2012

Brown Sugar Body Scrub

So I know I have been a failure at regular posting lately, but honestly I think I just needed a little break. It has been lovely. After being sick, I was able to finish my most recent class and take a week of "Spring Break" from school as well, before my next class starts. I have still had to work, but things have been much more laid back outside of that.

That being said, I am FINALLY getting aroung to sharing with you guys the brown sugar scrub that I made for my sister-in-law's birthday gift basket that I shared in this post.

To make the scrub, I don't remember the exact amounts that I used becaues I ended up doctoring it, but I believe I started with two cups of brown sugar, 1/8th cup of olive oil and 3 tbsps of honey. Then I may have added the ingredients without measuring to doctor it into what felt like a normal body scrub consistency. I forgot to take photos of this part! So sorry!

Next, I poured my gloopy mixture into a simple mason jar.
 I cut a square of white linen and placed in over the inner part of the lid and then twisted the collar over it, securing it in place and adding a bit of charm.
 Next, I hot glued a strip of burlap around the center of the jar, like this:
 I love the texture added by the burlap! To finish it off, I tied a cute little tag around it with some twine. I really could not be happier with the way that it turned out!
You will have to let me know if any of you try this! I really want to make a batch for myself, I just haven't gotten around to it just yet. Also, I finally finished that coffee table makeover, I just have not taken pictures of it yet! I promise to try to do so this week!

I hope you all are loving the springlike weather! I cannot WAIT to get our spring decor out. I loved what we had for winter, but I am over it! :) Hopefully I will get to that sometime this week too!

Thursday, March 15, 2012

DIY Thursday: Lucky Mirror

Its DIY Thursday!
Today's project shows how I used EAD Designs Vinyl to create a fun St. Patty's day decoration! I may just keep it further into the Spring!  Head on over to EAD Designs to see how I did it!

Friday, March 9, 2012

A Challenge

Hey friends!

So sorry for the lack of posting lately. It is finals week for the class that I am in and I have been really sick this week, thus no crafting or DIY-ing has been done.

In my absence, I wanted to share something with you all that I truly think you should read. My husband is a brilliant man and an amazing writer, and he shares his thoughts on his own blog. The post that he wrote today has really challenged me and I know others have found it very insightful. You should go and read it! Here is a link:

http://malee2.wordpress.com/2012/03/09/love-others/

I promise...let me get back to good health and submit this research paper that is due in 1.5 hours (yikes!) and I will have fun posts to share! LOVE you guys!

Wednesday, March 7, 2012

Homemade Hand Soap and Dispenser

You may remember a couple of days ago (in this post) when I showed you a gift basket of homemade items that I made for my sister in law. Today I thought I would share a little about one of the items in that basket!

Next time I make a batch of hand soap (which will not be for a while...I will show you why!) I will be sure to take step by step pictures to share with you guys. Basically, you find a bar of soap that you really like. You use a cheese grater to grate said bar of soap (4 oz is plenty unless you add more water). While you are grating the soap, heat a gallon of water on the stove just until it is steaming. Once it steams, remove it from the heat and pour in your ground soap. Let it sit for 15 minutes. After that, you will need to whip it with a hand mixer until it is well stirred. This is what mine looked like:
After this step it will need to sit for a minimum of 15 hours, overnight is best. In the meantime I decided to start working on my dispenser. I took a cute little smooth side mason jar.
And a soap pump that I had been saving for a project such as this.
Now the fixtures in their house are all Oil Rubbed Bronze, so I wanted to make this match. I taped off the pump head (paint would rub off with use) and the straw to the pump like this:
And I took it as well as the jar lid outside and sprayed them with Krylon ORB spray paint. In the meantime, my soap had been settling long enough. Now is the harder part (which is still not hard). The soap should be a big squishy blob in your bowl. Take your hand mixer and beat it well until it is smooth consistency like hand soap. It will probably form a froth on top like mine did. If it is too solid you can add just a little more water to thin it a bit. That is all you have to do!
I had my husband drill a hole in the lip of my jar to slide the pump through.
Then I simply used hot glue to secure the pump in place.
I filled my jar with soap and voila! A super cute Mason jar soap dispenser! I plan to make another one soon but witha cute twist! Can't wait to share it!
Now the reason I will not have the need to make soap to show you is this:
Yep! AFTER filling that large Mason jar, I still have a gallon of hand soap! I added a bit of lotion to this recipe by the way. It was just an unscented moisture cream. Made the texture so smooth! I highly recomment this recipe! So easy and you can totally choose your scent!

Tuesday, March 6, 2012

A Ducky First Birthday Cake!

As you may or may not know, one of my hobbies is cake making. I have always loved to do it. Well a few weeks ago, a friend who I had made a bridal shower and baby shower cake for contacted me to ask if I would be able to make a cake for her sweet baby boy's first birthday. Of course I was more than happy to! First birthday cakes are so fun! I thought I would share it with you guys :)

 She did not do a theme for the party, just a color scheme of lime green, yellow royal blue and light blue. The little ducky was the perfect way to incorporate some fun and color!
 The cake flavor was a vanilla pound cake and the icing is white buttercream. This was the first time I have tried that particular vanilla cake recipe but I think it is by far my new favorite!
 The top tier was removeable to use for his smash cake. Initially the duck was going to go on top, but I wanted more fun, colorful icing on the smash cake so I opted to move the duck down and pipe a big colorful "1" on the top.
 But the duck is still so cute! And he can play with it after the party :)
 To give credit where it is due, my mom found the little ducky. He was totally her idea!

There you have it. A super cute first birthday cake for a super cute boy!

Sunday, March 4, 2012

Home Made Gift Basket

Friday was my sister-in-law's birthday. When I started thinking about what we weregoing to give her, I wanted to do something thoughtful. She has had a tough year, so I thought giving her something relaxing would be fun. And then I started thinking about how fun it would be to have this gift be all home made! So I decided to make her brown sugar honey body scrub, lavender lotion with vitamin E, home made lip balm, hand soap in a cute little dispenser. I also made a rice-filled heat pouch that she can use in the microwave. I placed all of the items in a basket and put it in a basket bag.
I used some extra linen fabric that I used on the jar lids and for the heat pouch to create a rosette and then made cutie little burlap leaves and then I hot glued this to the front of the basket (inside the bag so that it will be on there if she wants to use it in her house.)
Here is a kind of "aerial" view if you will. I plan to go back through and share how I made some of the items in other posts.
That little green and white thing in the back is the heat pouch. I sewed a stripe of green and white damask fabric to the white litten before sewing it basically like you would a pillow. It turned out so cute! Unfortunately, I was not thinking and did not get a better photo of it than this!
I topped it all off with a burlap bow. I was SO pleased with the way it turned out and she loved it! My favorite thing about it was that it was almost entirely home made. The only thing that I did not make was the basket and there is a candle down in there that I just purchased. Now I want to go back and make myself a batch of everything!


Linking this to