Wednesday, April 20, 2011

The Big Reveal!: Girl Room

Here she is, friends. The room that I have been dying to show you for weeks! You may remember this room from this previous post. For the most part, it's done! There are some minor accessory projects left to do, but this is the overall look! Here's the view of the main part of the room. Skirt to hide junk: forthcoming. You can see the table process by clicking here.
Recognize that lovely chalkboard? :) You can see how I did it here.
Or this lovely chair? :) Which you can see here.

I picked up that cute mirror while I was working at Victoria's Secret. And the pencil/scissors cup, I wrapped a leftover strip of my lovely chair fabric around a Hunt's Spaghetti sauce can!! Free and adorable!
And my precious has a home. Now maybe I will be able to use it more!
This is the other chair, waiting its turn for beautification. For now, I draped the leftover fabric over it to make it look more cohesive. And one of my fun pillows that I have been storing.
Recognize that medicine cabinet? You can see how I made it so cute here.

 Yeah, I know the frames are crooked :) I got annoyed with them and decided to just leave them. Who cares right? I'll probably move them anyway.
 I love, love LOVE! our flooring. Its phenomenal, really.

The cork board I already owned. So it was free!

Here it is! All finished! Well, for now. You know me, I have projects up my sleeve. But its totally a cute and functional space that I can use and I don't feel a rush to make any changes just yet. I walk in there and feel so happy! Not pictured: my workout equipment hiding behind the door. I need to get off of here and put that stuff to use! ;)

Monday, April 18, 2011

A Table-Turned Custom Desk!

When we started re-doing the basement, I dreamt in my head what I wanted my "girl cave" to look like. The room is an odd shape, so I knew that I wanted to have a long desk that fit right into the end of the room so that I would have plenty of space to craft, etc. However, we did not want to spend much money at all, and were really looking to use what we already had. My dad offered to give me one of his 9 foot long tables that he had in his storage shed. PERFECT! Only problem is that my room is 7 feet wide. So one day dad came over and we laid that bad boy out and measured it to 7 feet.
Once we measured it, we stood the table up and he cut it using a circular saw. And his neat clampy thing. I am glad he did it for me because I had no idea what he was doing. He even bent the metal frame underneath and bolted it back on. Then he rounded the corners and put the rubber pieces back.
I failed majorly at the progress pics for this. So sorry, friends! But here's what I did. I took two cans worth of that WalMart $1 spray paint that I mentioned in my last post here and covered every inch of this bad boy. Now I have my hesitations about painting on laminate because it usually scratches or peels off. But surprisingly, once this dried it is pretty resilient. I had intended to give it a coat of poly but I don't thin that it needs it! Here it is in the girl room now. Another leetle sneak peek! (I plan to post the reveal this week!)
There. That shot doesn't really let you see the full table, but it doesn't let you see the girl room either! ;) I want to show you but I want to show you all at once! And most of it centers around the table. I plan to eventually add fabric to make a skirt for it so that I can hide my junk use that space for storage. Girl room reveal to come in a few days! I can't wait to show you! And then you will be able to see the table too....


Save Some Green!

Hey friends!

I wanted to let you know about a little something that I discovered the other day. Its called Ebates.com. Basically, you shop online like you always do but click through their website. And they give you cash back to your paypal account. Its totally legitimate! I signed up and got a $5 bonus and I am fairly certain that you would too!

Its totally free! You can sign up at the link below! Let me know if you do or if you have ever used it! I would love to know. It just seems to good not to share with you, friends! :)

Sunday, April 17, 2011

Chair Remodel

My dad gave us these chairs. He got them from his office a long time ago. They are comfortable chairs, but the problem is that they really did not match our decor at all. So, in honor of my girl cave being completed, I decided it was time to give them a makeover. The first one was a lot of work so the second one may be waiting just a bit. Here is what the chair started out as.
 After lots of staple pulling, this is what the back looked like. You will need needle nosed pliers for this. Its literally quite impossible without them. And lots of free time.
Several hours later, after pulling hundreds of staples from any and everywhere. I finally got the chair to this state.
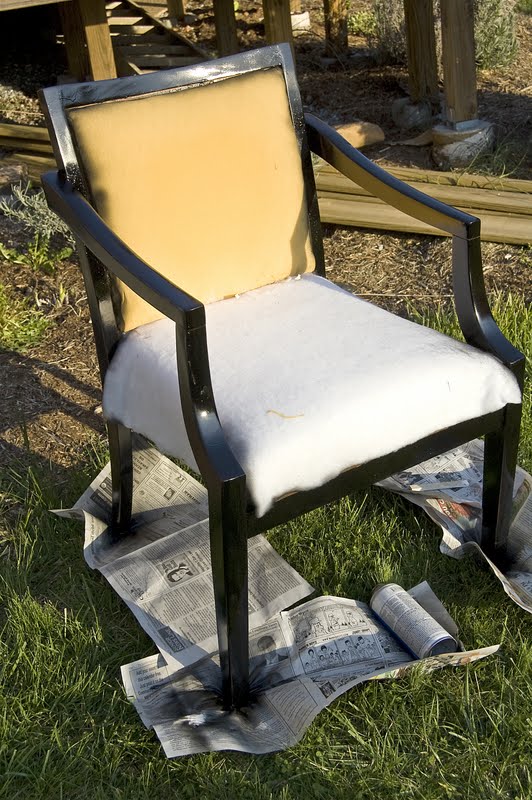
 Then I took her outside. And you will no believe this. I bought a can of $1 WalMart spray paint to use at a primer-type of coat. So that it would not take as much of the more expensive Krylon that I love. And one can of WalMart paint covered everything perfectly! I didn't even have to touch the Krylon! And it dried a satin finish which I thought I had gotten flat because I did not realize the WalMart brand came in Satin. Happy accident!
 Yeah I didn't even bother to cover the foam. I figured that the fabric I am using is dark enough to cover what little bit gets on it. And I was right! Glad I did not waste my time!
 Here she is all dry and inside. Just waiting for me to cover her with her loverly new clothes!
 I laid out the fabric that I bought. This was a thick upholstery quality fabric at Joann's. I was lucky that when I went in, the brand was on sale. I got 2 yards for $12.00!!! I may have to go back and get more. I will just pray its still on sale :). I laid my fabric on the floor and then laid the pieces of cloth I had removed from the chair on top. I cut my new pieces about 1 inch bigger than the existing pieces to leave room for error. This is why I may need more cloth.
 Then I just matched the pieces up and started stapling! (I'll post a tutorial for this part when I get around to chair number 2) Really to perfectly hide the staples I would have had to dismantle the back part of the chair. Hubby and I started to and then gave up. It was not an easy process. So I will hide my staples with a lovely chord trim soon! Here is halfway through the process.
And here she is all finished! The only thing I need to do is put that chording on. Just not ready to spend the money on it yet. You can't even see the staples unless you get really close and know to look for them! And this is your sneak peek of my almost complete girl room!
 *Sigh*  I love it. I love. love. love it. It was a lot of work but it looks SO GOOD in there!
One more time, just for fun. Here is what it looked like before:
And here is the glorious after!

**DON'T FORGET! Today is the last day to enter my giveaway!**
to enter!!

Tuesday, April 12, 2011

A Little Giveaway as a Thank You! ($25 value!)

I am officially at 124 followers! Now this is not and has never been about having "followers" for me. In fact I prefer to call you "friends." But I have officially hit this number and its way more than I ever thought my humble little blog would get! My newest friend, whoever you are, welcome! So, for all of my new followers and all of those that have been with me from the start...I wanted to give a little something back as a "thank you." Anyone can enter! Here's the deal:

I own a small stationery business here in my area. I wear lots of hats with this, but my most favorite thing to do is design custom monograms. I LOVE them. There is something so fun about taking a family and creating a piece of art that represents them and they can use for years to come. I want to create one for one of you. Typically I charge $25 for a custom monogram, but for one lucky friend it will be FREE! It will be totally custom and I would love to include any little extras that you want to incorporate! It can be as simple or complex as you want! Here is a little example that I whipped up:


Here's how to enter:

1. Become a follower and let me know.
2. Share this link on facebook and leave a comment with the link.
3. Tweet this giveaway and leave a comment with the link.
4. Blog about this giveaway and leave a comment with the link.
5. **Bonus entry!**Tell me in a couple of sentences what you would want incorporated in your family monogram.

**Please leave a comment for each entry**

Happy winning! I am SO EXCITED to do this for one of you guys!

Giveaway will be open until Sunday, April 17th.

Monday, April 11, 2011

An Easy DIY Curtain

Our kitchen window was naked from the day we moved in until about a month ago (yeah it took me that long to get this blogged...oops!). Usually I am perfectly okay with a naked window, but in the middle of all of the white cabinetry it just looked like it wanted something. So I set out one night to make a fabulous curtain for it and I only wanted to spend about $10 total. So I went to Joann's and found this cafe curtain rod set for three dollars. We will re-visit this. I know, you are thinking...gold?! In our kitchen. Ew.
 I chose this lovely fabric that matches super well. It was only $6/yard and I only needed a half yard! SCORE!
 First, I folded all of the edges over about a half inch. The top edge I folded about 3 inches to leave room for a rod pocket. And then i ironed all of my seams to make sewing them easier.

 Then I just ran a simple stitch down all of the sides, leaving room for the pocket at the top.
 My Christmas gift from my sweet husband. I love it. :)
 And here is the little rod pocket. I don't know if that is the proper term but its my term.
 Now for that gold rod. I hit the ends with some Krylon black spray paint. The effect turned out looking Oil Rubbed Bronze instead which is perfect because that's what our chandy in the kitchen is!
 You can see it a little better here? Maybe?
 So here she is all hung up. Please ignore the dishes in the sink. And my reflection. Keepin' it real my people.
 The view from the entry to the kitchen. I liked it. But as my 6'5" husband pointed out a few moments later when he couldn't see out the window....my drapes hang low. So I may end up hemming it?
 For the time being I kind of bunched it into a makeshift roman shade. I held it with straight pins and my intentions are to stitch it into a straight, crisp roman shade.
 Those are my intentions. Someday. For now it doesn't look terrible and I am okay with living like this. Maybe I will get the itch someday soon? Until then, I really am perfectly content with the way that it looks now.
So there you have it. $3 for the rod. $3 for fabric. and probably another $3 for the spray paint. Give or take. I can't remember if I already had it or went and got it. Either way...that's a $9 total max! Sweet deal!

Saturday, April 9, 2011

Awesome TJ Maxx Find!

So yesterday I paid our local TJ Maxx a little visit (which I have been trying not to do...too tempting). I did pick up one small item on clearance that I am thinking I will be turning into a wedding gift for my sister unless I get attached. Its really nice. I can't say what it is in case she reads it but I have big, beautiful plans for it! But I wanted to show you this AWESOME French Memo board that I saw.
Yeah they wanted $80 for it. Way more than I was trying to spend. But it was so cool! It was burlap on the back (which would be easy to make). and they had screenprinted vintage French looking things on it. and it had the cutest little fleur de lis push pins! I really thought it was fabulous. So I took a picture with my phone to share with you lovelies. Someone should go buy it so that I know it went to a good home! :)