Thursday, June 30, 2011

A Big Change!

Okay friends. I am really nervous about this post. But I am going to do it anyway. You only live once, right?? Please no one be mean...

This is about to get really personal. But its a pretty major change that I am trying to make, so why not get an extra almost 200 people supporting me! Here's the deal, not that I am super overweight or anything, but I am not what I would call in shape. And I have been feeling very low on energy and just downright crappy lately. Our sermon on Sunday was about not listening to the voices that tell you that you can't. (You can listen by CLICKING HERE)Why do I always tell myself that I can't be fit and happy with my body? I get so bogged down in what I can't...that I forget that I can!

So I decided on Sunday that I am going to make a change in a big way. I am going to start working out more and eating better. I asked my hubby to take a weekly progress photo of me and I will share it on here. I may also rant about wanting cake...we will see :)

Here is this week's photo. This is the very first and what I hope is a dramatic "before." The lighting is terrible. Its really not a good picture of me at all. I was about to start my workout. But here it is in all of its honest glory! This picture was taken on Sunday.
And here are my tools of choice (for now...I want to get P90X eventually but its not-so-budget-friendly). That video....I know the name is a little silly but it is an AMAZING workout! Ladies for real! Go to Target and buy it. And give it a few tries. It is intense but once you figure out the moves its so good. You are sweating within minutes! The jump rope is for cardio, since I don't always love to run :) Jumping rope can burn just as many calories! Betcha didn't know that! And the magazine..I have been subscribing for a year now and picking up little this' and that's along the way. I decided to start reading it cover to cover to keep me motivated! 
 And the trusty shoes! I mowed in them the other week, thus giving them green toes :( But they are great.
I really am so excited about this guys! I am only 4 days in and I already feel 100 times better! I can really feel the change starting. I have been trying to stick to a high fiber/protein diet (most through hard boiled eggs) and totally avoid sodas. I also have been eating lots of broccoli which is supposedly great for your intestines. Anyways...I know this is not cute house stuff related, but I am going to share this on here anyway! Why not!?!? If you notice me not posting about it for a while...leave me a gentle "how's it going?" comment, would ya?! Does anyone want to start this healthy change with me?? I would love a few blog friends to track progress with!

I will post a progress picture this weekend hopefully! Love you guys!

Wednesday, June 29, 2011

I Like 'em White!

This is probably my favorite project that I have done in a really long time! I have been dying to do it and now I finally have and I can share it with you! Don't you love the projects that are huge transformations, but don't cost you a penny?? I already had everything that I needed to do this little activity. All it took was a couple hours of my time and it turned out amazing! Here are the stairs before....
And here they are after!
 I love how much brighter that they look! And the rich stain of the treads really stands out now.
I can't get over how much of a difference that a little glossy trim paint makes when you paint the risers! It only took about two hours of my time and a very careful taping job. Every time that I walk down the stairs I have to turn around and admire them! I love that feeling. My goal is to feel that in every single room of our house. :)

Monday, June 27, 2011

De-magnifying the Fridge

Our fridge is really only accessible from one side. The other is up against the pantry. And the front is plastic-y and magnets don't stick well to it. So we always stick them on the side, which you see right when you walk into our door! Well, the problem has spiraled out of control lately. We had this unsightly mess:
 Two notepads, several notes, blockbuster movie codes, a million Liberty Football magnets, another million magnets, a bottle opener magnet, Christmas cards, Thank you notes, a measurement conversion magnet (which really is very handy!) and a neighbor's phone number that is already programmed in my phone! Whew! What a nightmare!

The other day, I had this wild hair that I needed to organize this mess. I took it all off. Then I started putting things back based on what needed to be there, what cold be stored elsewhere, and what could be thrown out. I must say, it looks MUCH better now! :)

Saturday, June 25, 2011

The Bathroom is Complete! (for now)

So this little bathroom downstairs has been in limbo for a while. The other night I had the urge to finish putting it together. That little ledge shelf was a Ross purchase for $2 a couple of months ago. I finally gave myself the kick in the butt to hang it. And then I just threw a couple of random objects from around the house to finish it off. Whether or not I will change it, who knows. For now it looks great!

 And then there is the beautiful artwork that I labored over! I really do like it in this room. It adds the bit of visual interest that the room needs.
There are a few very minor things that we still need to do in here, but none of them are super exciting. We need to hang the toilet paper holder and possibly add some moulding. Anyway...everything is starting to come together!

Thursday, June 23, 2011

Fleur de Lis art!

Remember how I told you I had stocked up on canvases from AC Moore? Well even if you forget...I did! And I just used another one for some more custom art! I found this foam stamp at Michael's for 25 cents! Yep! you read that right! And I love it! This is actually something I have been planning to do for quite a while.
I painted it with brown paint and stamped it in somewhat of a pattern all over my canvas. The pattern started off really well but then began to get off track so I just kinda went with it.
Here is the finished product! I really really like the way that it turned out! It has a vintage look to it as the fleur de lis are not all solid but have a slightly distressed look to them.
Bet ya can't guess where this is hanging! Kudos to whoever knows it! (Don't worry....I'll show you soon!)


Tuesday, June 21, 2011

Laundry Room is Coming Together!

I think that I may be done with the laundry room! (At least for now!) I found this awesome vinyl wall art on Amazon for $3.99! And I had an Amazon gift credit so it was fa-ree! I have seen this same vinyl on other websites for up to $30!
 I really think it adds so much to the room! I have been told that I have hit my limit for vinyl in the house though. :( I guess there is such thing as too much of a good thing. But this one is perfect for our room.
 Here is the hanger art in its original place. I hung it with command strips since that wall is cinder block and really hard to drill/nail into. I thought this was a great solution.
 ...until the command strips didn't stick to the textured walls!
 I have had this ball jar forever. I mean literally, I saved money for prom in it! And I wanted to use it in the laundry room. So I took some faux callas that look super real from my cousin's wedding and put them in the jar. This is where it started out.

 Then it moved to the top of the dryer to add a little class.
 I really loved it there. But then I remembered the need to pile clothes on top of the dryer when taking them out of the washer.
 So I moved it over to the ill-fated canvas hanging area. Risky business I tell you.
 But it looks so good there!
I know.....you are thinking that the picture is going to fall down and break my jar. That was not the case! I happened to be in the room when the picture fell and I caught it before any harm was done! Actually though, I really like it better just leaning up against the wall. It brings everything down to one level but still has dimension.
My poor jar did, however, plummet to its death. I hung one too many shirts on the poorly anchored shelf and down it went. My beautiful jar shattered to a million pieces all over the ceramic tile floor. :( Sad day in my life! Luckily, I had a small makeshift jar that will do for now. But I will replaced my Ball jar! I just have to find another one that is that big and lovely. Thus, another exhibit of my glass breaking skills. I will have to compile a list someday. Maybe I should start photographing this phenomenon...

Sunday, June 19, 2011

A Better Solution to the Soap Box

I buy powdered Laundry Detergent because it costs less and lasts longer than liquid. At least in my personal experience. The only problem is that the boxes that the soap comes in are not cute. In fact they are usually a little on the tacky side. The colors don't match our decor and I just don't love it. I know, I know...not really a big deal. But why not make it cute if you can?! So I went to WalMart the other day and got a clear plastic canister with a lid for $2.
 I had big vinyl letter stickers that I used to write the word "SOAP" on the canister.
 This looks so much better on the shelf! Now if only I could think of something cute to do with that bleach I would be all set. I am really loving the way that this room is coming together!
Does any body else feel me on the soap boxes? I really wanted to do a glass canister....but glass and shelves are a bad combo for me. That's another story for another time....

Friday, June 17, 2011

Art for the Laundry Room

I'm sure you all remember the newly painted laundry room that I showed you in this post. Well I decided that it really needed some art to spruce it up a bit. I got a 2-pack of canvases for $6 at AC Moore last week and figured it was time to put one to use! I took one of the canvases and spray painted it with white paint to cover the slightly tan tint to the cheaper canvas.
 I then found a chunky hanger that we have with a cute little swirl inside of it. I carefully measured to find the exact center of my canvas eyeballed to find the middle of the canvas. Then I simply traced the outline of the hanger very carefully.
Here is what it looked like once I finished tracing it. Then I took lime green paint and filled in the outline.
The first layer of paint was really splotchy, so I used two coats for a nice solid look. I really love the way that it turned out!
Check back in a few days and I will show you where this cute little baby ended up! I love it!

Wednesday, June 15, 2011

We Rock!

So, the last real post I did was to show you all the lovely mulch that we spread out in front of our house. Well after a lot of hard work...and a little miscalculation as far as how many scoops that we were going to need, I bring you the back yard! We decided after much deliberating that we wanted to go with white river rocks for the back yard in place of the mulch. Here is what we had before:
 It was a little on the rough side. The mulch was faded and old and I needed to pull weeds realllll bad. I pulled weeds for hours before we laid the rocks. It was lots of fun.....
Once we got all of the weeds done, we started to lay the rock. One. Shovel. at. a. time. It took forever. And since we didn't want to buy too much up front, we made three different trips to get the rocks. It also just happened to be a million degrees out and very sunny both days that we worked on this little project! But the after is so much better that it was totally worth it!
 This is the view when you walk out of our basement door.  I personally think it would be fun someday if we added a paver patio from the basement door that ran over to where the rocks are. But who knows if we will ever get around to that. Certainly no time soon. And I think the husband would need more convincing.
 We are thinking that the deck needs to be re-stained or painted. The previous owner must not have let the wood cure properly before he stained it, because the stain has all but worn off and it doesn't look quite right.
 This is the little area between the deck and the house. (where the water pours off of the roof and was making the mulch look terrible) We have had one storm since we put the rocks out and they still look good! And those little solar lights are amazing! They case little star shapes on the rocks and it looks really neat at night. Maybe I will try to get a picture for you guys!


 And this was such a pleasant little surprise! One of the fun things about your first year in a house is that you never know what plants are going to sprout up! I don't even remember seeing plants here last Summer when we bought the house, but these beautiful calla lilies came up! And they are my favorite flowers!
Needless to say, we really love the back yard now. However, I mowed the grass back there for the first time this week and it was not my favorite thing to do!

Tuesday, June 14, 2011

This is becoming a habit...

I am SO sorry that I have been royally failing at being a blogger lately. With not having internet at home and not wanting to spend my whole lunch break at work, my blogging time has been seriously diminished. Trust me, I have a TON of super amazing stuff to share with you guys! Just give me a couple of days and I will hit you with some major eye candy! LOVE you guys!

Friday, June 10, 2011

We Mulched!

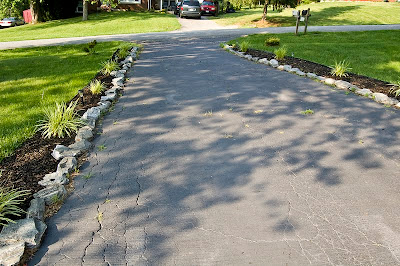
We have been in debate for a while about what we wanted to do to replace the dingy, faded old mulch that the previous owners of our house left for us. The great debate has been white rocks, black mulch or red mulch. The other day my hubby just took the plunge and went to Home Depot to get black mulch (which had my vote!). I came home from work one day to freshly laid, lovely black mulch. This was my view when I pulled in!

 I love how fresh it makes our plants look. I am a lover of dark mulch. Always will be!

 It makes our whole front yard look so fresh and crisp. Everything looks so much better!
 Yeah our driveway feels like its getting more and more cracked. We are not sure if it was beforehand and we just didn't realize it or if the winter made it worse. May or may not have to fix that. hm...
Now as for the back yard, we have had a hard time deciding what to do. We have some funky drainage issue with the gutters on the back of our house. (This may have contributed to our leaky basement). Basically, any time that we have a hard rain the water pours over the edge of the gutter and splashes onto the mulch. This washes it away and makes a muddy mess. So we have been contemplating rocks so as to combat this issue. This, however, is its own blog post. I'll fill you in soon!

Wednesday, June 8, 2011

Sometimes I just wing it.

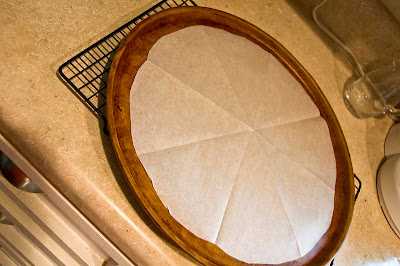
The other night Michael and I were invited to dinner at friends of ours from church's place. I was getting off work late the night before and only about 30 minutes before we were supposed to be there the day of, but I wanted to bring dessert. So I was trying to think of something really good, but easy and quick. After thinking for a while for a few minutes, I decided to just kinda make it up as I went. I wanted to make a fruit pizza with brownie crust. Now I know this isn't rocket science, but I wasn't feeling looking up a recipe so I just decided to make it up as I went. First, you start with a pizza stone:
 Then I cut out a circle of parchment paper to keep the batter from spreading. This was counter-productive but it was a nice thought.
 I used yummy chewy fudge brownie mix and baked it per the instructions on the box. Word to the wise, you may want to bake it slightly less time than the box calls for since its spread thinner.

 Once its all mixed up, you just pour it out onto your stone and bake it.
Then I pulled out my second love my KitchenAid and started to whip up the frosting.
I used one package of regular and one package of fat free cream cheese. You may opt to use just regular if you want it to taste as amazing as possible. Or both fat free for something a little healthier. I decided to get the best of both worlds.
I whipped the cream cheese, added some vanilla and sugar until it tasted right, and beat it well.
 It was super thick so I added just a little milk and whipped it more until it was creamy. This really was just me winging it until it tasted right. Fake it til you make it! :)
As you can see, my batter spread over the edge of the parchment anyway. So much for keeping it pretty.
 I spread the icing on and let it chill over night. When I got home the next day I sliced some strawberries and bananas and spread them on the pizza.
And then I drizzled it with chocolate syrup.
I have made one of these before, but topped it with M&Ms and it was delish! If you ever need an easy peasy dessert on the fly, this is the way to go! And it was really amazingly good. Have you ever made something similar? I know Pampered Chef has recipes for this. I also thought it would be good to top it with walnuts for a banana split type thing. I would love some ideas!